OCR
Table of Contents
- Accessing the OCR System
- Principles
- Limitations
- Hardware Requirements
- Live Video OCR
- Still Image OCR
Accessing the OCR System
The Pleco Optical Character Recognizer system is a paid add-on module; if purchased, you can access it through the “Live Video” and “Still Image” options in the sidebar menu. Each of those operates in several different modes, which are summarized below.
If you haven’t purchased the OCR module yet, you can do so through the Add-ons tab; there’s also a demo version accessible through there (just tap on the “Optical Character Recognizer” item). We strongly recommend that you try out that demo version before purchasing this add-on; while most of the people who’ve purchased have been very satisfied, it’s not perfect for everyone - the texts you like to read or the environment you read them in may cause problems for it - and you may find that it’s not reliable enough to be useful to you in its present state.
Modes
Live Video
Lookup Words (Box) - the primary way of using live Pleco OCR: point your phone’s camera at a word and its definition instantly pops up below.
Lookup Words (Crosshairs) - identical to the above except that you use a crosshairs instead of a resizable box to select characters to recognize.
Capture Flashcards - point the camera at a word and hold it there for a second or so to add it to your flashcard (or bookmark) database.
Capture Text - point the camera at a longer block of text and tap on a button to bring up that block of text in a document reader screen; you can then tap on characters in the text to look them up, or save the output to a text file. This is best for short blocks of text of no more than a paragraph or so.
Still Image
Block Recognizer - select a large portion of an image and recognize all of the Chinese text in it at once. You can then bring up this text in the document reader, copy it to the pasteboard, or simply tap on characters in the image to look them up just as in our regular document reader.
Scroll Lookup Words - look up vocabulary one-word-at-a-time just like “Lookup Words” in the live OCR system, but instead of pointing at the words you want to look up, you scroll / zoom around the image until they’re in the recognition area.
Scroll Capture Text - works the same as Scroll Lookup Words, but for capturing longer blocks of text and looking them up in our document reader / saving them to a text file (a la “Capture Text” in live OCR).
After choosing “Still Image” you’ll be confronted with an additional menu asking where you want to get the image from:
Take Photo: take a picture with your iPhone’s built-in camera (only visible on camera-equipped-devices, obviously). You can save the image after you take it from the main recognizer screen.
Photo Library: use a photo from your iPhone’s photo library / camera roll; this is where photos will end up if you sync them over from iPhoto or using Apple’s Camera Connection Kit or if you previously took them with your phone’s camera.
Image File: select an image file (.png, .jpg, etc) that’s been copied into Pleco’s document storage area or downloaded with the built-in web browser and crop / recognize that.
Principles
Much like our handwriting recognizer, our OCR system works by matching characters to templates in a database; it turns the image of the character into a simple mathematical structure, identifies its key features (lengths / positions / curvatures of strokes, etc), then searches through its database of 10,000+ Chinese characters to find the one that most closely matches that pattern.
However, while the handwriting recognizer always has a very clear picture of the character you drew - it knows exactly where every stroke is located, where it starts / ends, what order strokes were drawn in, where it overlaps other strokes - the OCR system has to contend with a much murkier one; characters on a camera image can be small, grainy, and out-of-focus, and the same calligraphic flourishes that make printed Chinese text so pretty to look at also make it harder to see the underlying structure of each character.
OCR is also up against some psychological hurdles compared to handwriting input; while a mis-recognized handwritten character can be chalked up to one’s poor handwriting / incorrect stroke order, with a printed character there’s nobody to blame but the recognition software. On top of which, because OCR must recognize multiple characters at a time, there’s less of an opportunity for it to show you its other, less likely matches like the handwriting recognizer does. Handling lots of characters at once also means that even if gets a higher percentage of them accurate on the first try, if just a few of those are incorrect it’ll still feel as if it got the entire block of text wrong. So while handwriting only has to contend with one character at a time, and can even be forgiven for getting that character wrong as long as the correct character is among its top 5 matches, OCR has to deal with multiple characters and get every one of them exactly correct in order to seem like it’s doing its job.
(this is all a convoluted way of asking you to be patient if things don’t work perfectly every time; we’re steadily working to bring this even closer to character recognizer perfection, but in the meantime we hope you’ll find it accurate enough to be useful in its current form)
Limitations
Here are some specific limitations to keep in mind when using our OCR system:
Printed text only - the templates which our system matches characters to are based on common printed Chinese fonts rather than on handwritten characters. Very neat handwriting might occasionally work, but officially only printed text is supported.
Limited character set - our system recognizes a total of 6,763 simplified Chinese characters and 5,401 traditional ones (for Chinese computing geeks, it’s all of the characters in the GB–2312 standard and the characters from the commonly-used half of the Big5 standard), so some rare characters may not be recognized simply because they’re not in the database. Every new character we support is another character that might potentially result in a false positive match, so we have to keep the numbers limited for the sake of accuracy.
Background interference - our system has a very hard time distinguishing Chinese characters from other things it sees - background images / patterns, intense shadows / bright spots, even simple rectangular borders around signs and such can all create problems. Turning on the “Sauvola binarization” option in Settings can help with background / lighting issues, and resizing the recognition area to include only characters and leave out any extraneous lines / patterns / etc can help with borders, but there may be some types of text (white characters with black outlines against a light-colored background, e.g.) that you simply can’t get it to recognize reliably.
Jitter - at the moment, the system can feel very “jittery,” frequently changing which characters it thinks it sees even when you’re pointing the camera at the same text. Turning on the “Hide unused chars” option in Settings can make things feel a bit smoother (though it doesn’t actually change the algorithm), and increasing the “Word detect samples” value in Settings can make the dictionary definition change less often at least; it can also help to turn on the built-in flash or simply turn on a nearby lamp, as this tends to make the camera see images more clearly and with less background noise. The history function also helps if you find that the definition changes before you have a chance to finish reading it.
Our new motion detection is the best solution we’ve come up with to this problem so far, so if you experience “jitter” issues we strongly recommend you try that out; failing that, still image OCR avoids the problem altogether. If neither of these solutions is satisfactory, you might want to consider a setup where your iPhone remains stationary and only the text you’re recognizing moves; for example, clipping your iPhone to a table and sliding a book around underneath it. In our testing at least, we’ve found that this produces much better results in moving vehicles and other shake-intensive situations (as any shaking that does occur affects the iPhone and the book equally), and if you employ the built-in zoom function, you can easily position the iPhone far enough away from the text to allow you to see every corner of the page without having to move the phone.
It may also be worth looking into purchasing an add-on macro lens (do an internet search for “iPhone macro lens” and you should find a bunch of places selling them) - these allow you to hold your device considerably closer to the text you’re reading than you can with the normal built-in lens, which reduces the impact of your hands shaking and might also allow you to rest them right on a book.
Focus - this one’s actually more of an cell phone camera problem than an OCR problem. At close distances, the iPhone camera’s lens has a very poor depth-of-field - in other words, the range of distances at which objects will be in focus is quite small - so even if you move the iPhone just a little bit farther from / closer to the page you may find that it quickly gets out-of-focus. Most of the time it’ll refocus automatically after a few seconds, but if it doesn’t, tap on the “focus” button at the bottom left corner of the screen to manually re-focus, or just give the iPhone a shake (this seems to reset its camera).
Line spanning - in English and other alphabetic languages, each word is generally entirely on one line of text; only very rarely do words wrap around (with a hyphen) to the next line. In Chinese, however, every line of text generally has the exact same number of characters on it, and so you routinely encounter words that start on one line and end on the next; e.g. the first character of the word is the last character in a particular line of text, and the second character of the word is the first character on the next line. This means that in order to look up that word with our OCR system, you need to point it at both halves of the word separately and combine them, which you can do through the span lines command; slightly annoying, but there’s nothing we can do to really “fix” it since it’s inherent in the nature of Chinese text.
Hardware Requirements
Any device that can run the current version of Pleco can use our OCR system. However, the built-in camera on the iPad 2 does not support autofocus, and so cannot get a clear image of text at close range. (we’re quite certain of this - we’ve tested it extensively) Hence, if you intend to use live OCR on one of those devices, we recommend testing the demo version thoroughly first to make sure that it meets your needs, and possibly also purchasing an add-on macro lens to improve its close-up focus abilities.
Also, the 16GB 5th-generation iPod Touch does not have a rear-facing camera at all, so it can only be used with still image OCR (with images loaded from another device).
Live Video OCR
Tap on “Live Video” in the sidebar menu to bring up the live camera OCR interface in its default “Lookup Words” mode:
Lots of options here, but most of them are fairly straightforward:
Top Bar:
- Sidebar - bring up the sidebar menu to switch to a different part of Pleco. (don’t worry about the OCR system running in the background - the camera stops running as soon as you exit the OCR screen, so you won’t have a lot of background CPU usage eating up your device’s battery)
- Camera - display an additional toolbar of camera controls - zoom, flash, and a black-on-white/white-on-black toggle.
- History - bring up a screen with a list of recently looked up words - you can view their definitions, add them to flashcards, play audio, etc through there.
- Settings - tap on this button to put OCR into a different operation mode - capture blocks of text to copy to another app / pull up in our document reader or scan a list of flashcards - or to enable our experimental Crosshairs Mode.
Middle:
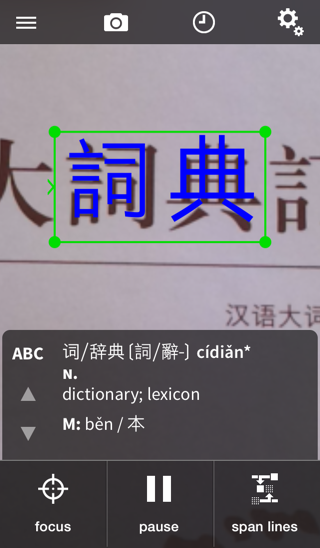
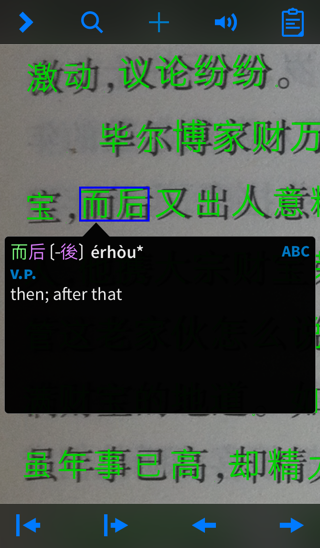
- Recognition Area - the OCR system will look up characters inside of this box, beginning from the side that the arrow (>) is on. Drag any corner to resize it. Characters that are part of the recognized word will be shown in blue, other characters in green. See below for more information.
- Switch Dictionary - tap on this button to view a definition for the same word in a different dictionary. This selection is “sticky,” so the OCR system will default to the newly-selected dictionary for later word lookups as well.
- Scroll Entry - tap on the up / down arrows to scroll through a list of entries (if more than one are found that match the current word).
- Definition - the dictionary definition of the recognized word.
Bottom Bar:
- Focus - tap on this button to re-focus the iPhone’s camera if the image gets blurry / out-of-focus; you can also just shake the iPhone to do the same thing. Long-press this button to lock the focus at its current distance (and stop autofocusing); tap on it again to unlock.
- Pause - tap on this button to pause recognition and freeze on the current word; this brings up a few additional options in place of the focus/span buttons.
- Span Lines - “lock in” the first half of a word that wraps around to the next line of text; point the camera at that first half, tap on this button, then point it at the second half to see a definition for the combined word.
Basic Operation
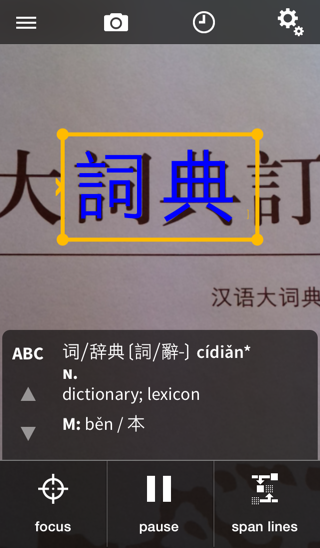
To look up a word, point your iPhone’s camera at the word you want to look up and square up that word within the recognition area. It’s OK if there are additional characters in the recognition area too; just make sure that the left edge of the recognition area (where the > is located) is lined up with the first character in the word, and (if there’s more than one line of text visible) that the top edge of the word is lined up with the top of the recognition area.
The OCR system will show you every character it recognizes within the recognition area in green, and once it’s confident enough in a particular couple of characters, it will “lock on” to those characters, show them in blue instead of green, and display their definition. If you point at a different set of characters it’ll quickly lock on to those instead, so you can scan along a whole line of text and read definitions as you go. (both the blue and green colors used can be changed in Settings)
Both horizontal and vertical text are supported; if the recognition area is resized to be vertical (significantly taller than it is wide), the > indicator will move from the left side of it to the top, indicating that Pleco is now recognizing text vertically. To pause the system and temporarily stop recognizing characters, tap on the pause button, or to combine characters from two different lines of text, tap on span lines. Tap on the history button (second from the right at the top of the screen) to scroll through the last few words recognized.
Recognition Area
The recognition area is the bright green box in the center of the screen; it can be resized by dragging any of the four corners (which resize it symmetrically but don’t move it around - it always remains centered in the same spot). Pleco’s recognizer will only attempt to recognize characters within that area; it doesn’t look outside of it at all, so it won’t pick up a character that’s half-in, half-out (or at least won’t do so accurately).
It’s perfectly OK if the recognition area is longer than necessary for a particular word, as long as the word is aligned with the left side (or the top if you’re recognizing vertical text). In fact, it can even help with recognition accuracy - seeing more characters helps the system get a better picture of their size / darkness / etc - so it’s quite reasonable to resize it as large as it will go and just leave it that way all the time. Since it won’t look outside of the box, though, resizing it to just one character wide is an easy way to look up the meanings of individual characters by themselves, and can also help to avoid “cheating” if you’re looking at a word that you’re supposed to know; looking up one character of a forgotten word may give you a hint without revealing the whole word’s meaning / pronunciation.
If you find that characters are too small for the recognition area, try zooming in (though this can reduce accuracy), or just hold the iPhone closer to the text you want to recognize. Conversely, since the speed of the OCR system is directly proportional to the size of the recognition area, if you find that the characters you’re recognizing are very large, you can consider turning on the “Shrink big images” option in Settings to reduce their size before recognizing them (greatly improving speed).
If you find that the recognizer sometimes thinks a compound character like 林 is actually two characters (木木), it may be that it’s having a tough time detecting the size of the font; making the recognition area wider may help with this, or if turn off the “Allow multiple lines” option in Settings (and make sure that the recognition area never stretches down to part of the next line of text) that should help also.
Pause Commands
Tap on the “pause” button at the bottom of the screen to stop recognizing characters and bring up this alternate toolbar at the bottom of the screen:

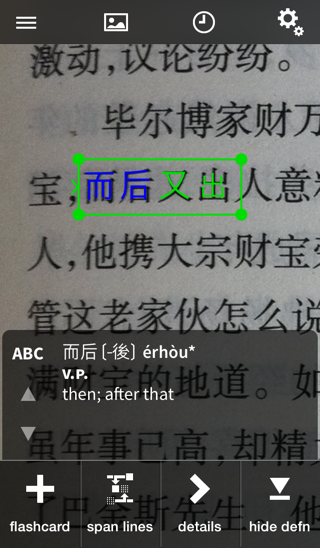
Tap on flashcard to add the current word to your flashcard database, or tap on details to bring up a full-screen dictionary definition (from which you can play audio, view example sentences, tap on individual characters in the headword to look up their meanings / stroke order / components, etc). Tap on resume to start recognizing characters again.
While paused, you can also tap on any character in the recognition area to look up the word starting at that character, useful if you’ve captured more than one word at a time. You can tap on the first character of the currently selected word to shrink the length of the selection, useful for looking up the individual characters that make up words.
Also while paused, you can also tap-hold on a character to bring up a screen listing similar-looking characters:
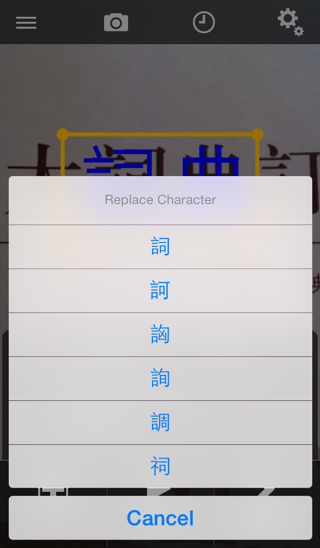
Tap on the correct character to replace it in the recognized text. (this will be forgotten as soon as you un-pause the recognizer)
Span Lines
Often when reading Chinese you’ll encounter a word that starts on one line and ends on the next, much like a hyphenated word in English (though much more common). For example:
我要给阿Q做正传,已
经不止一两年了。
已经 is a single word, but since it starts on one line and ends on another, there’s no way to simply point the recognizer at it and recognize the whole word.
Our solution to this is the conveniently-located “span lines” button. To use it, point the camera at the first part of the word (已 in the above example), then tap on “span lines” - you’ll see that character / characters appear just above the recognition area, like this:
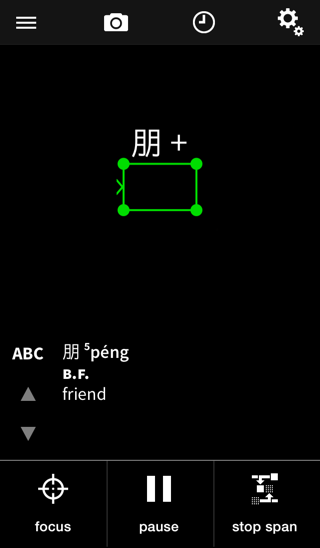
After that, point the camera at the second part of the word (经 in this case) to see the result for the entire word. Tap on the “span lines” button again (renamed to “cancel span”) to return to normal recognition.
Camera Controls
Tap on the camera icon (second from the left at the top of the screen) to bring up an additional toolbar just below the top one:

The first two buttons control the OCR’s zoom factor. This is strictly a digital zoom - there’s no magnifying lens in an iPhone camera, all we can do is blow up the image - so it only goes up to a maximum zoom factor of 4x; tap on the zoom in button once to go from 1x to 2x, then again to go to 4x.
The next button toggles the built-in LED flash - only available on the iPhone 4. It works quite well to illuminate objects at close range (like most of the text you’re likely to be looking up with OCR), but it can also confuse the recognizer by making some parts of an image much brighter than others (so it’s difficult to see where the text is) - turning on the Sauvola Binarization option in Settings can help considerably with this (at the cost of making the recognizer a bit slower).
The next option toggles the image orientation - horizontal versus vertical lines of text; Pleco will try to guess this automatically based on the size of the recognition area, but you can manually override it with this setting.
The final option toggles between black-on-white and white-on-black text. Most of the time the recognizer can figure this out automatically too, but if you find that it gets it wrong (you’ll know because the recognized characters will have absolutely nothing to do with the text you’re looking at), you can tap on this button to manually force it to one mode or the other. (the icon in the bar above is for black-on-white)
Motion Detection
A particularly useful feature of Pleco’s OCR is our “motion detection” system; this gives the recognizer the ability to automatically pause when it detects that your device has stopped moving, and resume recognizing characters once you start moving again. This is the best solution we’ve come up with so far to the problem of OCR output being “jittery” and changing the recognized characters when users’ hands are shaking.
This option is on by default, but you can enable / disable it later in Settings / OCR / Live Video / Motion Detection / Enable. When the system detects that the device has stopped moving, it will change the color / thickness of the box surrounding the recognition area (just as during a normal pause) and stop updating the character display until you start moving again:
There are lots of settings to customize the threshold at which the system detects that the device has moved, so hopefully with a little tweaking you’ll be able to get it to consistently pause when you want it to pause and resume when you want it to resume.
Crosshairs Mode
New in Pleco 3.0 is an experimental “crosshairs mode” feature; this skips the need for a recognition area altogether and replaces it with a simple crosshairs:

Point the crosshairs at the word you want to look up and Pleco will attempt to recognize that word. By default, we’ll also show you the line of text around it, though you can get rid of that with the “hide unused chars” option. This works best on faster devices (iPhone 5 or newer) and on very clear text without a lot of extraneous lines / symbols that might fool the system into thinking something is a line of text that actually isn’t.
Capture Flashcards
The second of the three “live” OCR modes is Capture Flashcards. This mode lets you point your camera at a word to instantly add it to your flashcard database; it’s almost like using a barcode scanner.
The interface for this is almost exactly the same as that for basic word lookups. When you first switch into it, you’ll see a prompt asking you to select a category for your new flashcards; choose that category and you’ll be presented with our standard live OCR interface. However, in Capture Flashcards mode, after pointing at the same word for a second or so (this interval can be changed in Settings), you’ll hear a beep and the screen will flash a message telling you you’ve created a new flashcard. This is especially useful for digitizing a long list of words at the end of a textbook chapter - you can enter each word in a fraction of the time it would take enter it manually.
Your new flashcard will be based on the currently-displayed dictionary definition; tapping on the Switch Dictionary button will change the dictionary used for the current and subsequent cards, though you can also go back and change their definitions later through Organize.
One important Settings option specific to Capture Flashcards is “Unknown word handling.” With the default behavior, “Truncate,” the system will create a card based on the longest match it can find for the word in the recognition area; if it only matches the first character then it’ll only create a card for that character. However, if you change this option to “Create Custom,” you’ll be prompted to create a brand new custom flashcard instead, with the headword pre-populated with the recognized characters; this is especially useful for items like character names that aren’t likely to appear in a dictionary.
Capture Text
The final “live” OCR mode is the most confusing but possibly also the most powerful; with “Capture Text,” instead of recognizing a single word at a time, you can recognize a larger block of text - several words, a sentence or even an entire paragraph - and bring it up in a document reader screen, save it to a text file, or save it to the system pasteboard to insert into another app.
This is similar in a lot of ways to still image capture mode, but unlike in that system, in Capture Text you see the results “live” on the screen so that you can make sure your text is framed up / recognized correctly (rather than having to go back and take another picture if the system gets it wrong the first time). However, since it’s accessing the iPhone’s camera in video mode instead of photo mode, the images it gets are much lower-resolution, so it can’t see clearly enough to recognize an entire page of text (and even if it could, it would be so slow as to barely constitute an improvement over still image capture).
The interface to this is still very similar to that of a regular word lookup, but with no Switch Dictionary / entry scroll buttons, and two new buttons replacing “flashcard” and “details” when paused:
Capture: bring up the recognized text in a standard Pleco document reader screen; you can tap on words in that to view their meaning, or save the results to a text file.
Copy: copies the recognized text to the system pasteboard, so that you can easily paste it into another application.
Also, the history button is missing in the top bar; there’s no history function for Capture Text at the moment, though if you turn on the “Combine captured text” option in Settings, each time you tap on “capture,” the recognized text will be appended to the end of the previously-captured text instead of replacing it; you’ll end up with a copy of all of the text captured during a particular recognition session. (though for scanning full pages we’d recommend trying your luck with still image mode instead)
Still Image OCR
Pleco’s OCR system also supports a still image recognition mode, much like a more conventional OCR system but optimized to work well with images from a camera (as opposed to images from a scanner) and to facilitate easily looking up unknown words.
As of Pleco 3.0, we’ve added experimental support for recognizing PDF files as OCR images, useful when working with PDF files that can’t be processed by our regular document reader PDF module. When opening a PDF file you’ll see two additional buttons on the right side of the top toolbar to let you jump to the next / previous PDF page.
Block Recognizer
This option is the most traditional of the three; it simply takes an entire image (or a cropped portion of it) and recognizes the text on it. It will begin recognizing as soon as you open the image; you can resize the crop area while it’s recognizing, you don’t need to wait for it to finish.
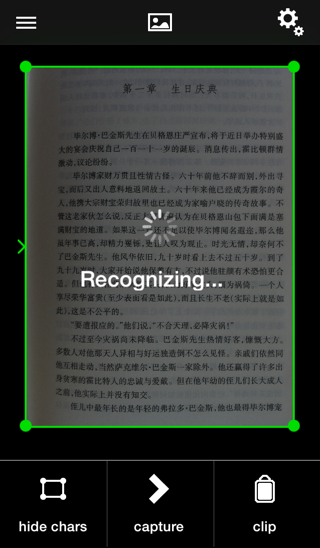
Once the recognizer finishes, the image will be overlaid with the recognized characters just as in live OCR. You can pinch-zoom to view these characters in detail, and tap on any word in the image to instantly look up its definition:
Tap anywhere in the image to exit the popup reader “bubble.” The interface to this is the same as in the main dictionary popup reader.
Tap on the “hide chars” button at the bottom of the screen to hide the green character overlay; you can still tap on characters to look them up. The “capture” and “clip” functions work exactly like they do in the live Capture Text mode - “capture” brings up the recognized text in a standard Pleco document reader screen (from which you can save it to a text file), and “clip” copies the recognized text to the system pasteboard so that you can easily paste it into another application.
Tap-hold on a mis-recognized character to correct it. Normally this has the same interface as the Live OCR equivalent, but if you’ve purchased our Fullscreen Handwriting Recognizer add-on you’ll get this screen instead:
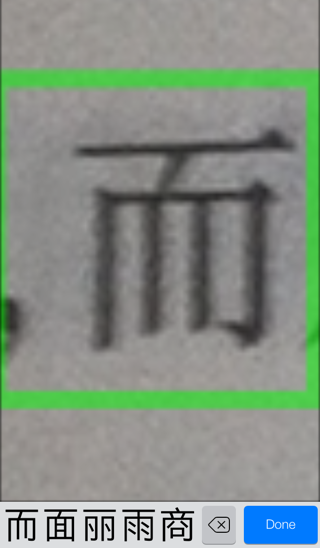
Simply draw the correct character on top of the original image to enter it using our handwriting recognizer. The results at the bottom of the screen when this screen initially opens are the best matches the OCR system came up with.
Tap on the picture icon in the top toolbar to hide / show a menu of image controls (similar to Camera Controls for Live OCR):

The first two buttons rotate the image 90 degrees to the left / right.
The next option toggles the image orientation - horizontal versus vertical lines of text; Pleco will try to guess this automatically by analyzing the image layout, but you can manually override it with this setting. If you see a lot of incorrect / wrongly-located characters, double-check that this setting is configured correctly.
The final option toggles between black-on-white and white-on-black text. Most of the time the recognizer can figure this out automatically too, but if you find that it gets it wrong (you’ll know because the recognized characters will have absolutely nothing to do with the text you’re looking at), you can tap on this button to manually force it to one mode or the other. (the icon in the bar above is for black-on-white)
Scroll Lookup Words
This mode works very similarly to the live video “Lookup Words” mode, but instead of pointing your phone’s camera at words you drag / zoom a still image around to position the words in the recognition area:
The image controls toolbar is the same as in Block Capture, and the history / flashcard / span lines / details / dictionary buttons work just like they do in live OCR. The main addition is the hide defn button - tap on this to hide the definition area, making it easier to pan / zoom around the image. You can also make the buttons and definition area smaller via Settings / OCR / Still Image / Interface.
Scroll Capture Text
This uses the same interface as Scroll Lookup Words above (panning around images to look up words within the recognition area), but instead of looking up individual words you can capture larger entire blocks of text and copy them to the pasteboard or send them to Pleco’s document reader (much like Capture Text from live OCR). It’s useful when you want more fine-grained control over the text you’re copying out of OCR, but for most users the Block Capture mode will probably do a better job with the same thing.
Back to Index